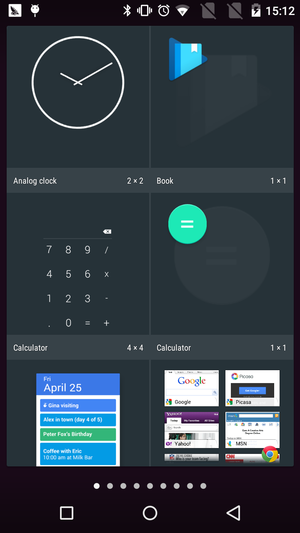
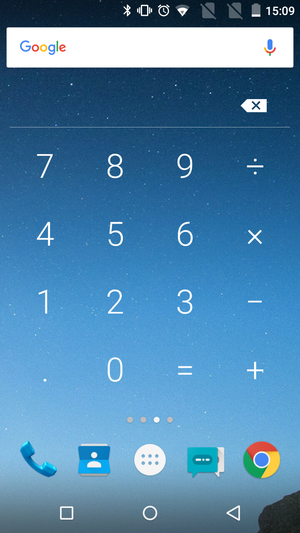
在开始之前还是先了解下什么是widget吧?!其实对于Widget我们就可以简单明了地理解为一个快捷的小插件,我们经常看见的桌面天气、时钟、音乐这些就是啦。当我们需要添加widget时,只需要长按launcher界面的空白处选择WIDGETS即可看见APP的预置widget,然后选择一个自己想要的长按拖动到launcher即可。下面我就以计算器的widget为例,大概阐述下开发widget的流程。


1. AndroidManifest.xml中申明widget
http://10.120.10.101/source/xref/msm8939_r3_ap_2-1/packages/apps/Calculator/AndroidManifest.xml1
2
3
4
5
6
7
8<!-- Receiver for the widget -->
<receiverandroid:name=".widget.CalculatorWidget">
<intent-filter>
<action android:name="android.appwidget.action.APPWIDGET_UPDATE" />
</intent-filter>
<meta-data android:name="android.appwidget.provider"
android:resource="@xml/calculator_widget_info" />
</receiver>
2. 添加MetaData对应的AppWidgetProviderInfo描述
http://10.120.10.101/source/xref/msm8939_r3_ap_2-1/packages/apps/Calculator/res/xml/calculator_widget_info.xml1
2
3
4
5
6
7
8
9<appwidget-provider xmlns:android="http://schemas.android.com/apk/res/android"
android:initialKeyguardLayout="@layout/widget"
android:initialLayout="@layout/widget"
android:minHeight="250dp"
android:minWidth="250dp"
android:previewImage="@drawable/widget_preview"
android:resizeMode="vertical"
android:updatePeriodMillis="0"
android:widgetCategory="home_screen|keyguard" />
3. 自定义widget xml布局
http://10.120.10.101/source/xref/msm8939_r3_ap_2-1/packages/apps/Calculator/res/layout/widget.xml1
2
3
4
5
6
7
8
9
10
11
12
13
14
15
16
17
18
19
20
21
22
23
24
25
26
27
28
29
30
31
32
33
34
35
36<?xmlversion="1.0"encoding="utf-8"?>
<RelativeLayout xmlns:android="http://schemas.android.com/apk/res/android"
android:layout_width="match_parent"
android:layout_height="match_parent">
<LinearLayout android:layout_width="match_parent"
android:layout_height="match_parent"
android:orientation="vertical">
<LinearLayout android:layout_width="match_parent"
android:layout_height="wrap_content"
android:background="@drawable/line"
android:minHeight="60dp"
android:orientation="horizontal">
<LinearLayout android:layout_width="0dp"
android:layout_height="match_parent"
android:layout_weight="3">
<TextView android:id="@+id/display"
style="@style/Theme.Calculator.Display.Widget"
android:layout_width="wrap_content"
android:layout_height="match_parent"
android:gravity="right|center_vertical"
android:longClickable="false"
android:visibility="gone" />
.
.
.
<Button
android:id="@+id/plus"
style="@style/Theme.Calculator.ButtonStyle.Widget"
android:layout_width="match_parent"
android:layout_height="match_parent"
android:layout_weight="1"
android:text="@string/op_add" />
</LinearLayout>
</LinearLayout>
</LinearLayout>
</RelativeLayout>
注意,这里的APP Widget Layout都是基于RemoteViews的,并不是支持所有的layout和widget。
A RemoteViews object (and, consequently, an App Widget) can support the following layout classes:
FrameLayout LinearLayout RelativeLayout GridLayout
And the following widget classes:
AnalogClock Button Chronometer ImageButton
ImageView ProgressBar TextView ViewFlipper
ListView GridView StackView AdapterViewFlipper
Descendants of these classes are not supported.
RemoteViews also supports ViewStub, which is an invisible, zero-sized View you can use to lazily inflate layout resources at runtime.
4. 提供AppWidgetProvider实现
http://10.120.10.101/source/xref/msm8939_r3_ap_2-1/packages/apps/Calculator/src/com/android/calculator2/widget/CalculatorWidget.java1
2
3
4
5
6
7
8
9
10
11
12
13
14
15
16
17
18
19
20
21
22
23
24
25
26
27
28
29
30
31
32
33
34
35
36
37
38
39
40
41
42
43
44
45
46
47
48
49
50
51
52
53
54
55
56
57
58publicclassCalculatorWidgetextendsAppWidgetProvider {
public void onReceive(Contextcontext, Intentintent) {
int appWidgetId = intent.getIntExtra(AppWidgetManager.EXTRA_APPWIDGET_ID, 0);
Stringvalue = getValue(context, appWidgetId);
if(value.equals(context.getResources().getString(R.string.error_syntax))) value = "";
mClearText = intent.getBooleanExtra(SHOW_CLEAR, false);
final Context c = context;
if(intent.getAction().equals(DIGIT_0)) {
if(mClearText) {
value = "";
mClearText = false;
}
value += "0";
}
AppWidgetManager appWidgetManager = AppWidgetManager.getInstance(context);
int[] appWidgetIds = appWidgetManager.getAppWidgetIds(newComponentName(context, CalculatorWidget.class));
for(intappWidgetID : appWidgetIds) {
updateAppWidget(context, appWidgetManager, appWidgetID);
}
super.onReceive(context, intent);
}
public void onUpdate(Contextcontext, AppWidgetManagerappWidgetManager, int[] appWidgetIds) {
for(int appWidgetID : appWidgetIds) {
updateAppWidget(context, appWidgetManager, appWidgetID);
}
}
private void updateAppWidget(Contextcontext, AppWidgetManagerappWidgetManager, intappWidgetId) {
RemoteViews remoteViews = new RemoteViews(context.getPackageName(), R.layout.widget);
Stringvalue = getValue(context, appWidgetId);
EquationFormatterformatter = new EquationFormatter();
value = value.trim();
value = formatter.addComas(newSolver(), value);
int displayId = android.os.Build.VERSION.SDK_INT >
android.os.Build.VERSION_CODES.JELLY_BEAN_MR1 ? R.id.display_long_clickable : R.id.display;
remoteViews.setViewVisibility(displayId, View.VISIBLE);
remoteViews.setTextViewText(displayId, value);
remoteViews.setTextViewText(R.id.display, value);
remoteViews.setViewVisibility(R.id.delete, mClearText ? View.GONE : View.VISIBLE);
remoteViews.setViewVisibility(R.id.clear, mClearText ? View.VISIBLE : View.GONE);
setOnClickListeners(context, appWidgetId, remoteViews);
try {
appWidgetManager.updateAppWidget(appWidgetId, remoteViews);
} catch(Exception e) {
}
}
}
AppWidgetProvider主要实现以下几个方法:
onUpdate()
onAppWidgetOptionsChanged()
onDeleted(Context, int[])
onEnabled(Context)
onDisabled(Context)
onReceive(Context, Intent)
这里最主要的最是实现onUpdate()方法,用于更新和展示我们的数据!
5. 参考文档
https://developer.android.com/design/patterns/widgets.html
https://developer.android.com/guide/topics/appwidgets/index.html
https://developer.android.com/guide/practices/ui_guidelines/widget_design.html


